An Easy File and Repair Record QuickBooks Solution
- lancebwilkins
- Dec 5, 2016
- 3 min read
This is the second in a series of blog posts that will specifically examine QuickBooks from an agriculture perspective. There is no “QuickBooks for Ag”. So how can we use some of the features in QuickBooks if we are in the ag business?
QuickBooks has the ability to keep electronic copies of documents and files of various sorts. It stores them with a link to transactions or list elements like customers or employees.
This is not a specific agriculture problem. But it can be useful both on a general business level, and as a specific solution for ag users. We’ll examine the feature first, then look at a unique ag application.

You may not have noticed before, but inside various windows in QuickBooks are found small paperclip icons and, in the case of one of the centers like the customer center, an entire column with the header “Attach”.
These are both indicators of the Attached Documents feature. The paper clip graphic in the ATTACH column of the customer list indicates that a document is attached to this customer.
The paper clip icon at the top of the screen opens the Attach Documents function.
A click on the paper clip next to the customer name, in this case MWI, opens a list of one or more documents linked to this customer. See the following graphic.

From this window, the pdf document can be selected and opened.
The icons along the top of the Attachments window show the variety of ways QuickBooks will accept a document for attachment.
It could be scanned in from a paper copy.
If the document is already on the computer, the computer icon could be selected. The user would then navigate to the correct location and select the file to be attached.
Other documents like Word docs and Excel worksheets can also be attached.
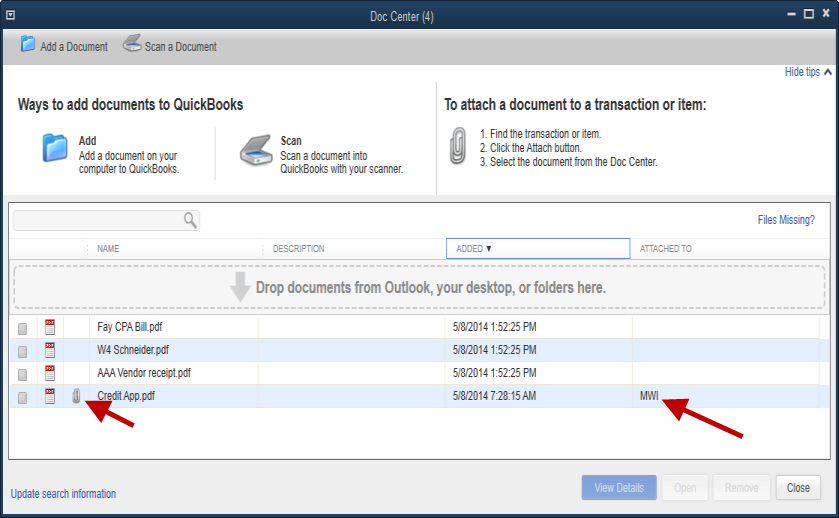
The Doc Center can be opened with the third icon, or is available from Company->Documents.

Four documents are shown in the Doc Center screenshot. It is easy just to drag the files from other locations and drop them here.
The arrows point to the indicators that signify the last doc of the list is attached. It is attached to the customer MWI as shown in an earlier screenshot.
The other three are not attached to anything.
It is possible to select documents anywhere on the computer or to scan them into the computer while a transaction or list is open. This action attaches them to the open transaction or list element.
It is also possible to drag them into the Doc Center and then find the place in QuickBooks where you want them attached.
Documents can be attached to transactions just as they can to name lists. Simply click on the paperclip icon.

There are limitations to the Attached Documents feature in QuickBooks.
When the QuickBooks company file is backed up, the documents are not. They have to be included in a separate backup.
Another shortcoming of the feature is security.
The documents are stored in a folder labeled ‘Attach’ in the location of the company file. There are no security precautions that prevent anyone from browsing through that folder and finding, deleting, or altering those individual documents.
So how about Ag? What special application does this have to the ag industry?
Documents can be attached to Fixed Asset Items. From the Fixed Asset Item list, highlight the item you want to attach to and click the Attach button at the bottom of the list window.

If we click on the paperclip icon belonging to the JD 8330 tractor item, the attachment will open. The attachment is an Excel spreadsheet, created earlier and attached to this Fixed Asset item. On that spreadsheet is a record of repair and maintenance costs of this particular piece of equipment.
It is an Excel worksheet which many farmers use now to track these costs. The difference is it resides with QuickBooks. I access it from my list of equipment within QuickBooks. I don’t have to maintain a separate folder with Excel worksheets, carefully naming each one so I am sure to record the repair costs on the correct one.
It’s a small thing. But small things that ease workload and save even a little time add up. This is one worth considering.
You can view this in a video here. It’s the same video as last week, we combined both procedures into one video.
Next week: attacking those pesky workers comp rates for employees with multiple classifications.
Lance Wilkins, QuickBooks Advanced Certified ProAdvisor
M Green and Company LLP


Comments