When a Customer is Also a Vendor
- lancebwilkins
- Jul 20, 2017
- 2 min read
This is a common scenario for small businesses. Another business buys product from you. They are a customer. But, they also sell to you. They are a vendor.
This is an issue in QuickBooks because a name cannot be both a customer and a vendor. And there is no way to trade services or products between customers and vendors.
At least, not in a straightforward, documented way. There is a solution.
Creating a name as both a customer and a vendor is not difficult. Change the name a little.
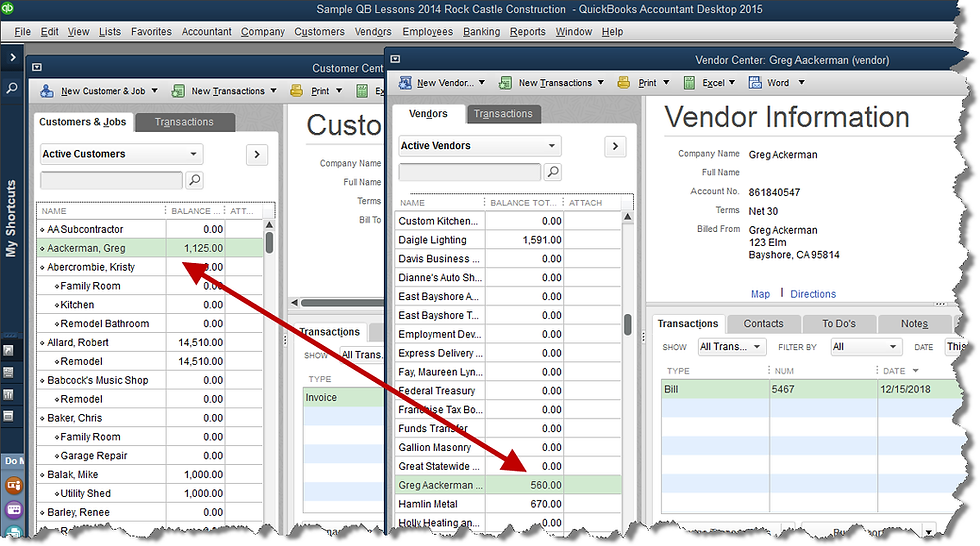
Let’s say we have a customer named Greg Aackerman. We want to put Greg on the vendor list as well.
In vendor setup, use the vendor name ‘Greg Aackerman (vendor)’, and fill in the “Print on Check as” field with the name only.

Create a new bank type of account. You’ll see why in a few paragraphs. Name the new bank type of account “Clearing Account.”
Recording transactions is simple. Use the customer, in our case Greg Aackerman, to record sales on invoices. Use the vendor, in our case Greg Aackerman (vendor), to record purchases on bills.

Saving the above transactions results in the following customer/vendor balances.

The puzzling part for most QuickBooks users comes now. How do we offset the balances?
First, note the amounts. Greg owes us $1125. We owe him $560. So whatever we do, we want to end up with a zero balance due to Greg the vendor and a balance due us of $565 ($1125 - $560) from Greg the customer.
Receive a customer payment from Greg in the amount of $560.
Navigate to Pay Bills and pay the bill we owe to Greg the vendor. Use the Clearing Account as the bank account to pay from.

Record a bank deposit. Deposit only the $560 payment we received from Greg and deposit it to the Clearing Account.
The result is that we no longer have a balance due to Greg in accounts payable. We show a balance due from Greg in accounts receivable of $565.
It’s important to double check and be sure we have created the transactions correctly. If we have, there should be a zero balance in the bank type account, Clearing Account.


