How to Find Any Accounting Document… Fast
- lancebwilkins
- Oct 26, 2018
- 2 min read

Even if we have a great filing system, things still get lost. When it comes to accounting documents though, we have a filing system right in QuickBooks that works pretty well.
All kinds of documents can be filed this way, but for our example to day, we’re going to look specifically at documents related to employees. These same procedures and capabilities apply throughout QuickBooks.

Above is a partial screenshot of the Employee Center in a QuickBooks sample file. Gregg Schneider is the employee highlighted. The empty paperclip icon on the right tells us no document is filed inside QuickBooks for Gregg. If the icon were a page with a paperclip, we would know there was at least one document attached to the employee Gregg Schneider.
The Attach column on the left of the screenshot shows which employees have attached documents. Currently there are none.
When thinking of documents we might want to save that would be specific to one employee, W4 and I9 forms are the first that come to mind. So what if we wanted to file these documents for Gregg within QuickBooks?
If we click the paperclip icon with Gregg’s name highlighted, as in the above screenshot, the following window opens:

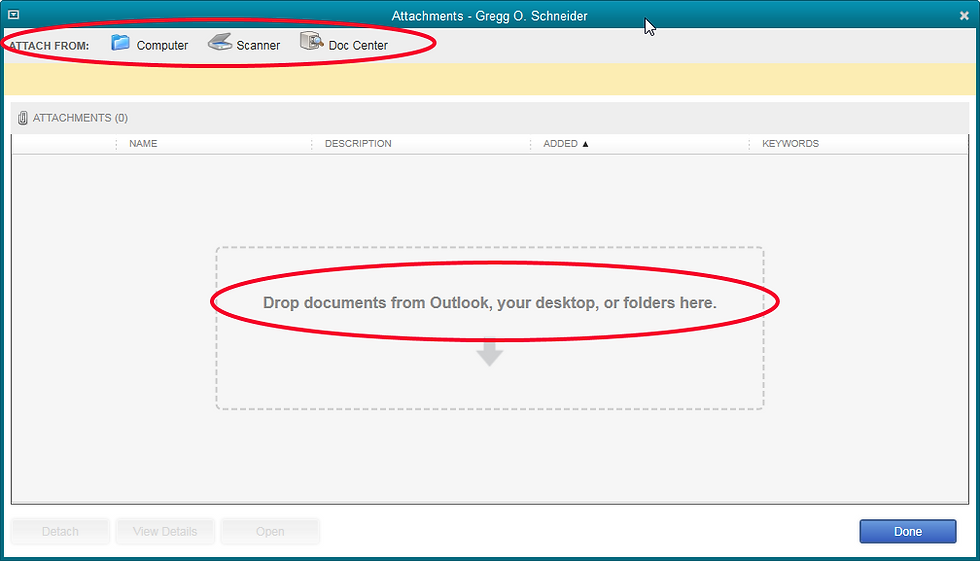
There are several ways to get a document into the QuickBooks’ Attached Documents system. You can see these circled in the screenshot. If you select Computer, a browse window, common to most Windows programs, will open so we may navigate to the location on our computer or network where the file we want to file here exists.
If we select Scanner, we can scan the document into the system. Doc Center is simply a place in QuickBooks, Company->Documents->Doc Center, where we could import or scan in several documents at once, then distribute to various transactions or list entries in our company file.
Last, as you can see in the center of the window, a file can be dragged directly into the window.
Let’s drag a couple of documents into this window.

There they are. Now we just need to click Done.

The Employee Center window has changed. Note the icon circled on the right. It may be difficult to see in the graphic, but the icon is supposed to denote a paper document held by a paper clip. On the left, you can see the paperclip icon now shows in the Attach column next to Gregg’s name.
Some additional things to know:
· A click on either icon will allow us to open the documents. They open just like any other pdf and can be printed, attached to emails, whatever we can do with a pdf file.
· Other file types, like Word docs and Excel worksheets can be saved in the same way.
· Documents can be attached to transactions too. Vendor invoices can be scanned in and attached to checks or bills.
· The attached documents are saved in a folder QuickBooks creates named Attach in the same Windows folder as your company file.
· There is no password protection on the documents if they are accessed through a Windows search.
· When a backup of QuickBooks is done, the documents do NOT backup with the QuickBooks file.

